
Pro Setup Tips
Setting up your SunBear Shade is super easy and you'll have it mastered after the first time!
Here are a few tips from the pros that will help you get it setup quickly and correctly.
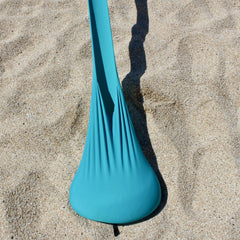
Step 1 - Lay out the SunBear Shade
- Just lay your SunBear out on the sand.
- We usually go with the logo facing up and in the back.

Step 2 - Fill the corner pockets with sand
- There is no such thing as too much sand in the corner pockets. When you think you’ve scooped enough, scoop a little more!
- It’s super easy when you lay the empty sandbags on their side, then scoop/push sand in. You can also push sand on the fabric above the hole and then lift it so the sand falls into the bag.
- Once the corner pockets are filled with sand you’ll want to stretch out The SunBear even more. Try and form an X with the legs. Once up, you can play around with the angles of the legs. Straight back and forth brings the tent a little higher. Side to side makes it lower. Somewhere in the middle is typically just right!
Step 3 - Prop up with poles
- The foam ball is the side that touches The SunBear. The bottom is held down by gravity but it never hurts to drive it into the sand a few inches.
- There are several great ways to set up your poles. Most common are 2 or 4 pole setups. For either of these, you’ll want to place the foam ball on the inside of the corner seam, closer to the outside.

Windy setup - The SunBear Shade works great in the wind if you set it up right. Here are a few tips for setting it up on a windy day.
- Lay it out with your back to the wind, so the opening is catching the wind.
- More sand! It helps to reinforce the sandbag with more sand, too!
- The more stretched out, the sturdier your SunBear will stand.
- You can drive the poles a few inches into the sand and angle them facing out and up.
